
Deutsche Moden Zeitung or the German Fashion Magazine in English is my very first, German fashion magazine. It's year? 1940. Place of Publication? I thin it is Berlin so this is very high German fashion from what I can gather. I found it on ebay over the summer as a part of a little retail therapy and to broaden my horizons of German fashion and patterns. This is not the first time I have looked at buying this magazine, it is the first time I have decided to try to tackle it though because the patterns are like nothing you have seen before. Here, take look:
 |
| The Patterns |
At first glance, the patterns are a mangles, snarled mess. An atrocity to dressmaking. An eye sore. To my mom, it was a murdered road map, to my sister, a headache. To me? A challenge I wanted to try to conquer. But, what attracted me to buy this magazine? Do you really want to know? It was the pretty dress on the cover. Yes, that is the truth. The very shallow, very vain truth. I thought the woman on the cover was chic, beautiful, and one I wanted to idolize. I wanted her dress. . . .badly.
Once I got the magazine, I flipped through the delicate pages and was graced by the beautiful and timeless designs that lived within its aged pages. Included with the dresses, separates, and even coats, were articles on housekeeping and, I am guessing, what it was like to be a modern German woman. At the back of the magazine, as a separate leafelet, was the massacre of lines that they called a pattern. . . .Give it to the Nazis to come up with this mess. . . gah!!!
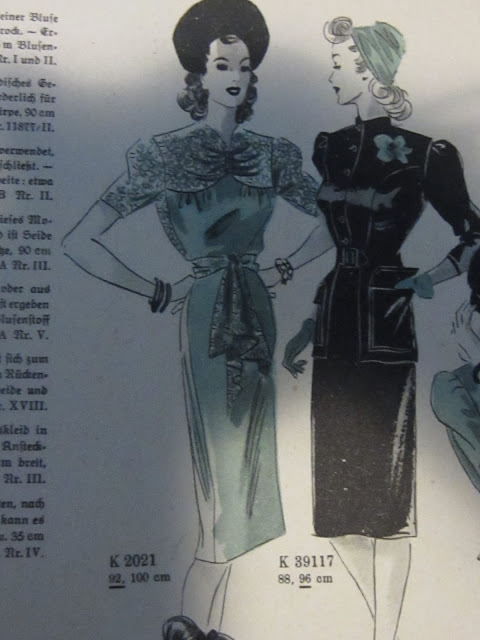 |
| Magazine Line Drawing/ Illustration |
 |
| The Dress from the Back Line Drawing |
 |
| Description of Dress from the Back Cover Detailing the Front Cover Illustration |
So, how did I manage to decode this swarm of squiggles, arrows, dotted lines, and the like to make a pattern I could use? (Yes, I did it . . .and let me tell you all about it . . .)
To start, I found the dress on the cover in the magazine itself and found it's pattern/ design number. It was 2021. Next, I un- folded, CAREFULLY, the pattern sheet and studied it for HOURS. I looked at it. And looked at it, and looked at it some more until I could not see straight. After studying it, on the margins, I found 2021 and the little patterns pieces I would need to recreate this look. So what were they?
Bodice Front Top - 227
Bodice Front Bottom -228
Bodice Back Top - 229
Bodice Back Bottom - 230
Sleeve - 234
Skirt Back - 232
Skirt Front - 231
 |
| Detail of the Pattern Line Drawings in the Margin |
 |
| The Margin detailing the Making of the Dress Pattern. Notice that the pieces are marked out with the solid double lines and the lines with two headed arrows. |
Thankfully, on the margins were the design number, 2021, and a little illustration of what the pattern pieces looked like. On the little illustrated pieces, a number. In the accompanying text, it detailed what the lines of these patterns were. They were either solid double lines or little goofy arrow lines. I am sure too the text described how pretty the dress would be made up too . . .
Using these numbers to mark the pieces and what they were and the little picture guide on the margins, I knew what my pieces were to look like. Now, I had to find them. That was the hard part. To find them, and to know where they were going, I had to again refer to the margin . . each numbered piece is outlined in a different kind of line. The pieces for the bodice were in a double solid line, the skirt and sleeve in a double arrow dash mark. . . .
Finding the numbers was like finding Waldo in a field of bloody, fricking Waldos . . .. . .I think all said and done, it took me 3 hours to get the pattern pieces. . . .
Anyway, how I get my pattern pieces. I started with the top bodice front pieces, number 227. I first found number 227 on the pattern sheet and once I found the number, I knew that the double solid line I had to follow was close. By a miracle, I found it! Next, with my eyes and fingers, I traced that line to get an idea of where it was exactly. Since I had to trace the pattern on to another sheet of paper, I grabbed my pattern paper. Placing the pattern sheet on the floor with my tracing paper in top, I CAREFULLY traced the pattern. On more than one occasion I traced the wrong line and had to do a little retracing but eventually I got the hang of it. I found that the best way to do it was to not think about it. When I looked at the pattern sheet as a whole, I was overwhelmed. Once I broke it down and focused on the lines I had to follow, it was not too bad. . . .
 |
| The Dress Bodice Front Pieces Traced Out . . .Not Yet Cut Out |
 |
| Top Bodice Front Pattern Piece |
Another thing that helped was that along the top and bottom of the sheet were numbers, like a key on a map to help you locate the numbers you needed from the masses.
I bet you are wondering, how did I find my size??? That is a good question and it had to do with pure luck. You see, I did not know this but this magazine only has patterns in one size: small and small/medium. The patterns are fixed in size unlike the Lutterloh patterns. If your measurement is not in the magazine, tough luck I'm sorry to say. The measurements, I am guessing, are on the bust in centimeters. The average was between 92 - 102 cm. Thankfully I am about a 96 but can fit into a size smaller or larger.
After I had managed to get the bodice top front pattern out, I did the bodice bottom front. Then, the back pieces, then the sleeve, and then the skirt. Overall, they traced out o.k. but I know I messed up a little bit and had to fudge it a bit. . .o.k. maybe a lot here and there. The sleeve pattern I trued up a little bit. . . The skirt pieces were not given in full but had to be added to at the sides. They had to be extended so that when finished they were about 70cm long. I knew to extend these lines because at the ends there were little black arrows pointing to the very edge of the paper. That and I was at the very edge of the pattern paper and could trace no further.
 |
| The Dress Pattern Pieces Cut Out |
Once I had the pattern pieces all cut out, I wondered if the seam allowances were there and I had no idea. I am sure it says so in the text but I can't really read it (I can not read German). To err on the side of safety, I added a little seam allowance because you can always let in a garment and not always let out . . .
Now I just have to find the material. I love the mixing of a solid and print and hopefully I can do that for my own interpretation too. . . .
. .. . . Stay tuned my friends . . .